
How To
Shrinkbag A Bird
If you have never shrink-bagged a chicken, it's about time you learned. The following step-by-step photo tutorial shows exactly how it's done. The same process applies to shrink-bagging turkeys.
First, you will need a big pot of clean hot water to dunk the bagged chicken into. A propane-fueled turkey deep fryer, like shown in the photo below, will do the job just fine.
If you happen to have a thermostatically-controlled Whizbang Chicken Scalder, you can clean and disinfect it after processing your birds, then refill with clean water, reset the temperature controls (proper temperature is discussed next), and use that for shrink-bagging your chickens.

The manufacturer of our shrinkbags recommends a water temperature of 180 degrees. I have successfully shrink-bagged birds at 190 to 200 degrees.

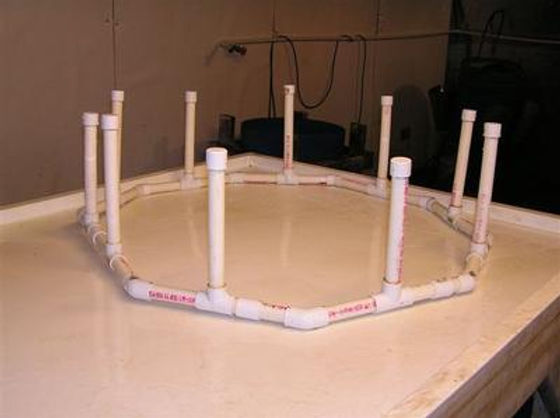
After processing your birds and cooling them down in some sort of cold-water chill tank, excess water must be drained off the bird and out of the body cavity. The picture below shows a batch of chickens draining on a homemade PVC drain rack.

In the next picture you can better see how the PVC rack is put together. This particular rack was made by Lewis Rave, of Jasper, Minnesota.
Once your chicken is sufficiently chilled and drip-dry, put it into the bag head-end first. You can, of course, also just put the bags over the chickens while they are propped up on the drain rack, as shown in the picture before last.

Bunch the open end of the bag together, down tight to the chicken, and twist the bag around several times, as shown in the next picture. It is important to note that a chicken goes into the bag easier when it is past the stiff (rigor mortis) stage of its afterlife—a stiff bird does not compress and bag as well as a flexible bird.

Some people use metal hog rings to secure the twisted bag. Hog rings work real well, but need special pliers to crimp the rings. Another option is to use inexpensive 4" plastic zip-ties, as shown in this next picture.

You can use a pair of pliers to get a grip on the zip tie and pull it tight...

This next picture shows the chicken all bagged and zip-tied...

Once bagged and zip-tied, the bird is not yet ready to dunk in the hot water. There is one more very important thing that needs to be done. The bag must be pierced to create a vent hole.
Without this vent hole, air in the bag will not be able to escape as the bag shrinks tight to the chicken. Without a vent hole, you will end up with something like a chicken in a bubble, and you don't want that.
A pinhole is not sufficient for proper venting. You need a slice about 3/8" long. A little bit less or a little bit more is okay. In the following picture I'm making the slice with a Chicago Cutlery 7" boning knife, which happens to be my favorite knife for butchering chickens.
Where you pierce the bag is important. I suggest you pierce it in the center of the breast, as shown in the picture below.

Now it is time to do some shrinking. In the picture below I am about to dunk the bagged chicken down into the hot water. hose insulated rubber gloves are real handy around hot water. The reason you might want to use some insulated rubber gloves is that the hot water tends to bubble up some as the bagged bird is lowered into the water, and the air is forced out the vent hole. Be careful!
Lower the package down into the water slowly, leave it submerged for two or three seconds, and take it out. You want to dunk down past the twist tie, but not try to dunk so far that the loose end of the bag goes under water. This will ensure that no water can channel down into the bag above the zip tie. After shrink-bagging 3 or 4 birds, you'll get the hang of it, and be an expert.
Re-dunking is not recommended because it might introduce water into the bag through the vent hole.

Once the bag with the bird has been "dunked and shrunked," trim off excess plastic above the zip tie. Scissors will do the job. Leave a pigtail at least 1" long. And while you're at it, snip the excess zip tie tail down so it looks nice and neat.

The picture below shows the vent hole after the bag has been shrunk. This hole should be covered with freezer tape, or a label with freezer adhesive backing.

Before applying tape or a label, the surface of the bag must be dry. A paper towel will absorb water and dry the area just fine...

The labels I used on the bagged chickens in this tutorial are not ones that I sell. They are sample labels that were sent to me by Stu McCarty at Grower's Discount labels. If you want custom labels with freezer adhesive for your poultry, I highly recommend Grower's Discount Labels.
Freezer adhesive is important because you don't want the labels to fall off when the chickens are frozen. If you don't have a freezer adhesive on your labels, they will fall off.
It is important to note here that freezer labels are not waterproof. Therefore, do not label the bird and put it back into a chill tank of water. If you do that, the label will fail, and water may enter into the bag through the vent hole.

Here's a beauty shot of the shrink-bagged chicken sporting a custom label from Grower's Discount Labels...

This next picture shows the bottom of a shrink-bagged chicken, which is the head-and-neck end of the bird (with out the head and neck, of course).

Here's a view of the flip side of the chicken (the side opposite the label), which is actually the back of the bird...

In this next picture you can see the sealed end of the packaged bird. Clearly, these shrink bags do a remarkably nice job of packaging a chicken.

This final view shows the nice, two-color label from Grower's Discount Labels...

Beyond the good looks of a shrink-bagged chicken is the matter of reduced potential for freezer burn. When the thick plastic (65 micron) laminated barrier bag is shrunk tight to the bird, there is very little air left in the package, and that translates into a significantly better frozen product.
The picture below shows a chicken that was sealed with a Food-Saver vacuum sealer. It lost its vacuum seal in the freezer and suffered from freezer burn as a result.

With our poultry shrink bags, the plastic is shrunk tight to the bird—you can't lose the seal like you can with an improperly sealed vacuum bag.
And, of course, shrink-bagging is far better than just putting the chicken in a loose plastic bag with a twist tie. Sure, a loose bag is a less expensive packaging option, but you haven't saved any money if your chickens get freezer burn and look like this six months later...

So there you have it. As you can see, our freezer bags are not only simple to use, they provide you with a practical and beautiful poultry packaging option.